Monday, June 22, 2015

Regency/Federal Hair Pieces, Part One: Making the Pieces

Edit: You can now find part two of this showing how to work these into long hair here.

This post includes hot and sharp things: please use caution and common sense. If you cannot be trusted with hot and/or sharp things, maybe go do something else instead of suing me because you are burned and bleeding. 

Several people have asked me about how I do my hair for the Regency/Federal era, so I thought I'd dust off the old blog and explain. This post will show you how to create the hair pieces I have been using. For the sake of keeping it short(ish), I will write a separate post soon on how I work them into my hair.


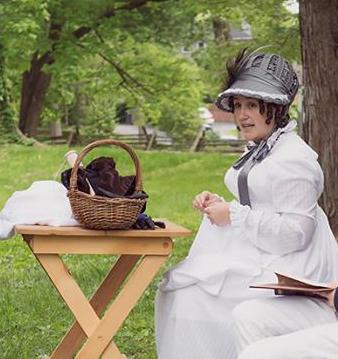
In action at Locust Grove.
Photo by Fox & Rose Photography.

My hair comes down past my waist. Before a recent cut, it was below my butt. And while I love it dearly, it is actually too long in the front for perfect little Regency ringlets. I used to try wrapping the front parts around a bun in the back and then pinning them in place and curling them. That worked alright, but it was very time consuming and the curls didn't always do great in high humidity. It was also impractical if I didn't start the day with an outlet handy, and let's face it, some of the coolest places to sleep just don't always have electricity!

Since it is so long, I would have trouble fitting it all under a wig. Wigs also add to the heat factor, which is the last thing I need in a Kentucky summer, so pieces I can tuck into my hair are the best way to go for me. (If you are interested in doing a full wig, you can see a wonderful tutorial from the Bohemian Bell here.)

To begin with, you will need the following


  • Hair scissors 
  • wig clips
  •  needle and thread (the thread won't show but you should still find a color that doesn't stand out from your natural hair color, I'm a brunette and I'm just using some black here)
  •  curling iron- dont' use your best one (I'll explain below). For  the curls right around your face I recommend a 3/8 barrel. I also use a 1/2 inch for some larger ones in the back. 
  •  hairspray
  •  (not pictured) roller pins/ bobby pins 
  • Fake hair (or human hair)


Now, I know some people taught the benefits of using human hair, and you can totally use that if you want to. Personally, I am uncomfortable with it, so I use this stuff. The following instructions should work for either. Make sure whatever you get says that it can take a curl.


This stuff holds a curl well, and is very cheap. This package was $6.99 and it is going to last me a good long time, since I only go through a few inches at a time. You can usually find this or something similar at ethnic hair store wherever you live. You can also search for it on Amazon.

It can leave a little bit of residue on your curling iron. This wipes off pretty easily while still warm, but this is why I don't recommend using anything extremely expensive or fancy (I got mine on Amazon for $20 or so). Please do a test strip on your iron and use caution and common sense.

It comes in different lengths. This stuff was 10 inches, which is a little long for what I needed, so I took off 2-3 inches. When you take length off the bottom, try to layer it a little instead of just chopping right across to create a blunt end. What you want is something that will fit nicely into the bottom of a curl. I haven't tried this, but someone who knew what they were doing with a razor blade could probably create a nice effect. Again, please use caution and common sense and don't sue me. (Trust me, I'm a teacher, you're not going to get much. )


For these pieces, you want a piece about 3-4 inches wide which will give you 3-4 curls. I usually double it over to give more volume, so I would cut an 8 inch piece. It is held together at the top with a nylon weft so it shouldn't fray when you cut it (human hair should be similar). Double it over and sew the two lengths together on the weft so you have one nice secure piece.


Prepped and ready to curl. 

Now it is time to start curling! I do this on my ironing board (SO much easier than trying to do it on your own head!!!).

The next two steps can be done in either order, depending on what you are comfortable with and what kind of hair you are using. I have heard from folks using human hair that it may be easier to sew the clips to the weft first, since human hair may not hold a curl as well the first few times it is set. Personally, I like to make sure I have gotten the curls the way I want them before I bother sewing on the clips.

The instructions that come with this 'hair' are as follows


The directions tell you to hold the 'hair' on the iron for 2-3 seconds. Personally, I have found that I need to hold it on a hot iron for at least a full minute for the curl to take. I recommend you try a few experimental pieces with your iron first to get a feel for how long you need.


You will want to leave at least an inch of uncurled hair near the base. This will be covered with your own hair to hide the base and clips you will be using.

Gently remove the curl and slide it off the iron. Be very careful to keep the curl's shape as you go. Once you have eased it off, it is still not completely set. Don't let it fall or bounce around. Gently gather up the curl with two roller pins or bobby pins to keep its shape and spray with hairspray.


As you go, trim away any fly-aways with your hair scissors. Since this isn't your hair (or anyone's!) you can be pretty liberal about trimming and sculpting. These should last you awhile, but even if you trim so much that you eventually can't use them anymore, the materials in one set cost less than a dollar, so trim away!

Repeat for the rest of the hair. Once you are done, you will want to let it sit overnight with the pins to set the curl. You can also just leave the pins in until you are ready to wear the curls- this will be a good way to keep them neat and tidy wherever they are stored.


Now it is time for your wig clips. These are fantastic little things. Since they are made of spring steel, you can slide them in where you want them, then just press down for them to snap closed and they hold very well.  They have little holes in the top that makes it very easy to sew them to the nylon weft. 


You can do this while they are still setting, but be sure that the hairspray has dried or your hands will get all sticky.


Finished piece- back view with wig clips stitched in place. 
You don't need to match the thread exactly but make sure it doesn't contrast. 


Close up of the stitching. 

And that should be it! Be sure to store them someplace they won't get smooshed. Storing them with the pins in is best to keep them tidy.  The best part is, you can do all this way ahead of time, and when you wake up at an event with no outlet, you can just take them out and snap them into place!


Finished piece -front view.

Stay tuned for Part Two, where I will show you how I work them into my hair.

**Thank you to Melissa Alexander for her proofreading and for sharing her experiences**


Wednesday, February 5, 2014

NBD, but yeah, 30 tomorrow.

oh yeah, I turn 30 tomorrow.

I don't normally really like my birthday. For those of you who don't understand how anyone could not like their birthday, the best way I can describe it is that when I get all that attention and it's not related to actually having asked for it or accomplished anything it makes me feel.....exposed. Like, "why are all of you looking at me? Oh god, they're onto me!" Onto me for what, I don't know, but then that's the silly rub of insecurity, constantly being afraid someone is going to 'find out about me'....that I'm 'wrong', that I'm weird, etc. Except well, in reality I know I'm not wrong and you're all weird too....so yay.


Legit

Anyway, the reason for all this rambling is that while I don't normally like my birthday, 30 feels like something I need to acknowledge and celebrate. Not the birthday, the age. My 20's were, I think, exactly what they needed to be. In some ways they were what I wanted....in more they were just what happened, and what needed to happen. I remember my 20th birthday, being so full of ambition and drive....for...something. I had vague ideas, dreams, and some determination that life was supposed to be interesting and about being smart and talented and accomplishing things and achieving my potential. I suppose I meant academically and professionally, but also personally. I wanted to be in love, to find that person. I did not want to settle down and have a family in my 20's. No, first and foremost, this decade was supposed to be about me becoming *me*. 

There were certainly some things in there I never expected- burying my father is at the top of that list, but also the whole crazy year that followed. None of that was anything you see coming, but it was all also formative. And it happened in a weird way that made sense with my family and my life. My father was always a big part of who I am- in his death, he set me on the path to where I needed to be. Seeing that man march boldly into the great hereafter......well, what excuses did I have to hold myself back?

There were also less dramatic things- like driving all over California in an old Jeep doing Faire with people I loved. Finding all those people who are like a family to me. Learning to drink, and do it well.I went to graduate school and am in fact actually doing the thing I wanted to do when I was 20 and began the ride that was these last 10 years. 

awesome parents FTW


It's been good times :-)


And hey, found the love of my life! Certainly wouldn't have put money on that working out so well or so quickly, more than two seconds before it happened.


Yeah, I think I'll keep him :-)


So not a bad deal, in the end. Certainly I didn't think I would end up in Kentucky. Kentucky was a funny place then- a place you only mentioned because it seemed so random. But I did want to get out. I kept wanting to, making false starts, then ending up back in the Bay. It's nothing against where I come from, I love it there. But I have become a firm believer that you should experience other places and people. I guess it just took me awhile to be really ready. 


Yep, I live *here*. 


In many ways, looking back on that girl on her 20th birthday, full of vague hope and ambition, I think I got where I wanted to be...only once I got there I understood what that was. 

I feel about ready to be 30.

Sunday, May 12, 2013

1812 Orange Liqueur Recipe


This recipe came from a book called Advice to a Young Lady in the Colonies; being a letter sent from Mrs. E. of England to Maria Macarthur in the Colony of N.S. Wales in 1812.

 Apparently "Mrs. E" was some kind of godmother to the young lady and new bride who had just set off to begin her housekeeping in Australia. It is principally concerned with food; recipes, menus suitable for different sizes of parties and occasions, etc.


I have had this book forever. Someone gave it to me at some point years and years ago, and it looked interesting, but sat on my shelf. Every time I moved and went through my books, I would look at it and say 'oh yes, that, still looks interesting, still totally mean to look at it one day,' put it in a box, schlep it to the next place, put it on the shelf, and there it would sit till I moved again.

I think this is where having had to make the very hard choices on what to move 2300 miles came in handy- if I decided to take it, I sure as hell better finally crack the pages and do something with it.

Upon finally perusing its pages, I found the following recipe

"Orange Liqueur

Into a wide-mouthed glass jar put a quart of good brandy, a pound of powdered lump sugar and a quarter of a stick of vanilla. Stir these until the sugar is melted. Then put in one fine, smooth-rinded, unspotted orange, whole, without being cut in any way. Cover the jar close, and set it aside in a warm place. This liquer takes two or three months to make, so as to be well impregnated with the perfume of the orange."


"Yes, let's definitely do that thing" said we "sounds yummy'. However this proved somewhat easier said than done, since upon further reflection, this list of ingredients actually started to look pretty foreign.

 For starters, we realized that what we thought of by 'powdered sugar' was probably not the same as what someone in New South Wales in 1812 would think of. Upon consultation with some educated folks, the general consensus was no, it isn't, and your best bet is probably to get some natural cone sugar from a Mexican market. 


The label said "Before best December 2014"....which is how you know it's legit. 


Unfortunately, this was not 'powdered'. No matter......


Me: "Am I being insane about this?"
Brian: "Yes, but its cool, we're the same kind of insane"
Me: "Ah, alright then, just so long as I have company...."


I powdered it myself. 

I got it mostly powdered, with some small chunks left I was hoping would just dissolve. As it was, there is actually still quite a bit of sediment in the bottom which does not seem to have any intention of further dissolving. Brian assures it will be fine and we can strain it if we need to, but in future I'm not gonna stop hammering till it's smooth. 

We also weren't entirely sure about what a 'stick' of vanilla would be. We are guessing this must be a bean. I mean, they're pretty stick-like. They are also, as it turns out, extremely expensive. Luckily the recipe doesn't call for much. I actually put in one half of the two beans you get in a jar for $8.50 at Kroger. 


"I cost more than a latte."


This was another point of 'Are we being insane? well, yes, but let's just accept that and go with it."

In other words, yes, one could probably figure out a conversion to just use vanilla extract, but by then we were hell bent on actually recreating the original recipe. At this point we had spent at least two months talking about this and tracking down the ingredients. I believe the orange I finally put in there was the third one we had bought for the purpose, since the other two had gone bad waiting to be used.

Since it said 2-3 months we are hoping it will be ready to share at Jane Austen Festival in July. 

This shit had better be fucking delicious.........


The orange 'impregnating' the brandy.....should I be blurring this?


Saturday, May 4, 2013

Notes from the Victorian Man

Hey look, my honey started a new blog- ya'll should check it out and follow.

http://notesfromthevictorianman.blogspot.com/


Drawstring dress- complete!


Finally, a mere 2+ months from beginning this thing, it is FINISHED.


The bodice pattern was draped by the amazing and talented Maggie Waterman


Posing for this shot involved my boyfriend saying the phrase 'yeah, I can back up and take it'......so yeah, that happened......


I made the bottom ruffle as a separate piece. It is attached it at the top of the ruffle, with the bottom roughly even with the hem of the dress, hanging over about 1/4". It was easier to leave the bottom unattached rather than try to get it all to lay down smooth, and it doesn't seem to be flopping or rising up about as I wear it (knock on wood). If it becomes an issue I'll just tack it down in a few places. 


Dorset buttons from http://www.wmboothdraper.com/. Waiting for these to come in the mail was the final thing holding this up, even after I had worn the damn thing. Cannot tell you how good it felt to sew them on there and label this dress as DONE.


In action as Lizzy Bennet in Vevay, Indiana 
Photo by Andrea Kappes


There was a fair amount of obsessing to get the right about of poof in the sleeves- from how long to make them, to how much I wanted the sleeves to come onto my hand, to how long the trim should be for that to happen, to moving the wristbands around once they were in and I had worn it once. I  must say, I am pretty damned please with myself on the results. 


'Cause that's how we roll...........


Saturday, March 30, 2013

Cabbage and Potato Soup

Hopefully this one doesn't look too similar to the last one. We added lentils again for a bit of protein, but it would be fine without them. The cinnamon stick adds a very different flavor, and cabbage is my current new-found vegetable.


Hellooo little friend...you have an appointment,  with my stomach! 
MHA HA HA!


1/2 onion
enough olive oil to coat the bottom of your pot
4 garlic cloves sliced - leave big enough that they will pop up as a tasty morsel in your soup
1/2 green cabbage chopped
2 medium potatoes cubed
1 can stewed tomatoes- you may need to chop these but be careful not to lose the juice. You want that for your broth.
1/2 cup lentils (optional)
8 cups water
3 small bay leaves
1 cinnamon stick
*basil to your liking
salt and pepper to taste

Heat olive oil in pan then begin sauteing garlic for a minute or two. Add and saute onions & cabbage for  5-10 minutes. The Cabbage needs a bit of time to begin to soften and wilt. Add salt, ground pepper and basil. It will smell awesome- you're welcome.

Add water, tomatoes, potatoes, lentils if you are using them, and cinnamon stick. Bring to a boil then simmer for about 30 minutes.

Made three hearty meals for two people. Probably more if you added bread in there.


*some of the recipes I was looking at called for dill, but we didn't have any and I hate leaving the house.


Saturday, March 16, 2013

Weekend productivity. Shocking, I know.


Today I finally tackled (half of) the ever growing, ever looming mending pile. It's been sitting there, in the corner, taunting me, as it ate my wardrobe, piece by piece. I think frequently the simple projects are the ones which get put off the longest. The 'oh, I just need to run a few stitches through it...." and cut to a year later, where I have sewn three ballgowns, but that 2 minute project where I sew three inches is still pulsating in the corner like the the Tell Tale To Do Item.

The breaking point was getting out of the shower on a Saturday morning and realizing that I had no jeans available without tears in them. So I put on the rest of my clothes (yes, this is a story where I sew without pants) and finally got to it. Once you start, it's freakin' exhilarating.


It's like going shopping, but for broke people!

The rest required buttons, which will require a trip to JoAnn's in the near future (read, you will be getting an update on the second part of the pile sometime in early 2014....right about the time it has redoubled to its original size....). 

In other sewing related news, the drawstring dress is 99.9% done. I just need to get some cord for the wristbands. I will do a final update with lots of pics then, but for now...


mmmm, yummy ruffly goodness.....