Wednesday, December 13, 2017

Home Organization with the Workwoman's Guide


Winter Break is finally here, and for this teacher that means time for a little household tidying! All of my recent projects, while delightful, have definitely left a mess in our cutting room dining room, so that was where I started. This included all kinds of small bits of fabric for potential caps and other projects.

Organizing lots of little bits of things is always difficult for me. Luckily, The Workwoman's Guide has the following suggestion

"A rag bag is a desirable thing to have hung up in some conspicuous part of the house, into which all odd bits, and even shreds, of calico, print, linen, muslin, & c should be put: as they are useful to come in when a gusset or chin stay, or other small article is wanting. Those bits too small for this purpose may still be used by school children, for practicing stitches; or, at all events, may be disposed of to the rag merchants, and thus prove of some value at last...."


Obviously I could not go any further with cleaning until I made a rag bag!


She goes on to say that

"Another family bag, for the purpose of containing stray tapes, or shoe strings, hooks, eyes, odd buttons, pieces of silk , or bits of ribbon, may be kept with advantage; especially where there is a large family of children, whose demands for these small articles are daily and constant."


Since I do, in fact, have stray ribbons and pieces of tape about the place, this seemed like a good idea as well. She also suggests a small bag to be kept in your work-box for these things, which I also want to do, since those and thread are usually what causes a mess there. 

The Guide is full of this strong desire for what the author considers 'economy' and efficiency. Today, we might think of it as 'sustainability', but whatever you call it, I think she has a few lessons to teach us about it.  I usually put bits of fabric which are big enough under the sink to use as cleaning rags. Some of these will still doubtless end up here, but this will keep them clean in case I want to use them for caps or some other small thing. And I did add some pieces which I would normally have just tossed, but which really will be good for chin stays for infants caps or other similar projects in the future. 

We have come to think of large-scale industrial production as being more efficient, but it is marvelous how the home economy described in the Guide finds a use for every last piece of material. 


Unfortunately I don't think I'm going to have a value or use for those little tiny scraps the author would have given to the rag and bone man. It's a shame, as I really hate to throw things away. It's really an excellent example of how wasteful we have become compared to our ancestors who used everything. 


Sunday, December 3, 2017

The Workwoman's Guide - A gown for infants of the 'lower classes'

"Another Infant's Flannel Gown"

So I am sewing my way through the Workwoman's Guide. As detailed in my last post, I've been making-up some sewing which will be appropriate to send to some of my friends at the Dickens Fair to work on in character.

I had a lot of fun with the caps in my last post, but I wanted to move onto something bigger that people could really show off as part of a gig at Dickens. But I also wanted to keep it pretty simple, so anyone could easily pick it up and work on it. I found the perfect option among the various instructions for making gowns for infants:

"This shape is the one generally used by the lower classes , not only for flannels, but for print gowns and petticoats; and is preferred to others on account of the ease with which it is cut out, and also because there is much less needle-work in the making up: there is, however, some waste, which is an objection. The gown is 13 nails long , but as there should be no seam on the shoulder, the two breadths must be cut in one length of 26 nails, which is 1 yard 10 nails. Double it in two, so as to be 13 nails long, and then fold it in half very evenly down the middle, so as to make the four selvages lie exactly one upon the other, and pin them firmly down to keep the folds in place; then, after measuring three nails from the selvages at the top (see A S), to determine the length of the sleeves, cut out the part S C D, to form the neck of the gown. Observe that the part from S to C is nail deep, which should be nicely rounded off, and from C to D, the bosom is cut straight along...."


This was nice and straightforward. It does not explicitly say how wide the breadth should be, but going off the sketch, the folded over fabric is 7 Nails (3+ 4), so the full breadth  would be 14 Nails (31.5 inches). This was the smallest breadth listed among the other gown variations, and my understanding is that that was a common width of fabric in the period.


This was pretty easy and fun to sketch out. I felt a bit like the mice from Cinderlla with my chalk and pattern book! The only thing that seems a bit odd to me are the sleeves, though I followed the directions clearly. 


To me  they look a bit skinny, especially relative to the body of the gown. To be fair this was designed for poor Victorian infants, who may have been undernourished, certainly compared to modern infants. However were I to make this again I think I would add a half inch to the sleeve measurement and adjust the curve in the arm accordingly. 


Can you count the cats in this picture? 

Next up, construction!

"The gown is next shaped at the side; and to do so properly, put in a pin at S, and fold it in a regular slope down to the bottom of the gown. Measure down the slope from the top, S, the distance of 2 nails, and put in a pin as a guide; cut off from the bottom upwards to T, and rounding it off at the corner, slope along T K for the sleeve, allowing 1 1/2 nail width for the wrist . In making it up, the seams should be joined with a mantua-maker's hem and a band should be sewn on the inside of the front, to be 6 nails in length, and about 1 1/2 nail below the neck. Cut a button-hole in the gown at each end of the band, draw with a bodkin a piece of tape through one hole, and fasten it down at the other extremity of the band; do the same with the other button-hole, so that on pulling the tapes, the gown will be drawn up, and neatly fulled in the front."


I used some 5/8 inch twill tape to create this band on the inside.


I used 1/4 inch twill tape to pull it up, and did the button-holes with a waxed linen thread.


This was quite fun to 'neatly full' in the front, however it left the actual neck large and floppy. There are no instructions whatever here about finishing the neck, but there is a line in the plate which looks like a drawstring casing.


So I turned the neck under to create the casing, and made two more buttonholes in the front for a drawstring. I used more 1/4 twill tape for the string. All the tape you see here came from William Booth, Draper at the Sign of the Unicorn. 


This allows you to draw up the neck to match the middle, so I have to assume it is supposed to happen, it just somehow didn't make it into the actual written directions.


So, having gone through two of these projects now, my big takeaway is that you definitely need to compare the plate and directions, and use your best judgement. 

Now, to get it all packed up and in the mail for the final two weeks of Dickens! 

Friday, November 17, 2017

The Workwoman's Guide- Caps for Poor Infants

For those of you who are not familiar, the Workwoman's Guide was first published in England in 1838 by 'A Lady'. Geared towards Middle Class and wealthy women, the Guide includes sewing and cutting instructions for many different garments, including those which might be worn within their own home. It also lays out clear instructions for making clothes for the poor to wear.

I have long been wanting to get my hands dirty, so to speak, and recreate some of these garments. I finally found my excuse as the time rolls around once again for the Great Dickens Christmas Fair in San Francisco. Dickens is a wonderful Victorian Christmas extravaganza, where visitors will meet characters from Charles Dickens novels as well as historical characters such as Queen Victoria and Dickens himself.


Queen Victoria and her ladies 

These include ladies of quality, as well as many of what the Victorians called the 'deserving' (and 'undeserving') poor.  The perfect people to be creating and receiving some of these garments! And since I cannot attend myself this year,  I decided to put some projects together to send out to some of my friends there to work on in character.

The Guide is organized by chapter with accompanying image plates. Each chapter is broken up by garment type, and then into variations on that type. These are clearly delineated based on whether they are for wealthy or the poor. There is a whole section in Chapter three on making caps for infants and young children, which including several variations based on age of the child and income level.
For my first project, I chose to make caps for poor infants, from Plate 2 Fig 12 & 13. The description is as follows

"This is much used by the poor, and is easily made and as easily washed. Take of the material a piece 6 nails down the selvage, and 3 1/2 nails wide. Double it, letting D be the double part. Sew up the back from A to C, leaving a hole or button-hole at the top, C; make a runner all round the front and behind, at half a nail's distance from edge, which is hemmed with a very narrow hem to form a frill: also, lay in a runner from E to F: next, sew a bobbin at B, letting one end of the string hang outside, and the other, being pulled through the seam, remains inside the cap. The end is carried up and brought out through the hole at C.....when worn the tapes, at being tied together at B, draw the cap up into shape, and if neatly arranged and pulled out with the fingers, it looks very neat and pretty....some put a loop of bobbin inside at B, which, on being brought out through C, fastens to a button at B, on the outside."

According to the Guide, a 'nail' is 2 1/4 inches, so 6 nails by 3 1/2 nails is 13.5 inches by just under 8 inches.


The illustrations on the accompanying plate look as follows


There were a few things that confused me with these instructions. First of all, how to make the runner? Also, the illustration clearly has a strap (which, interestingly, is placed differently in Figure 13 than it is in Figure 12), yet the instructions include no mention of such a strap.

I made a couple of prototypes just folding the fabric and stitching in a channel, but I wasn't satisfied with the shape it gave.

But then I looked back at some of the earlier sections in the chapter. An earlier set of instructions for

"Child's Flannel Cap" contained the following instructions

"Two runners, or string cases.... are then made by hemming neatly two bits of soft tape or sarsenet inside....."

Here then was the solution! It appears that this Lady did not feel the need to repeat anything which would work generally for all variations within the same garment group. Having already defined how to make a runner for a cap once, why take up more space doing so again?


I used tape for the runners on my next attempt and was quite pleased with the results.


Next was the chin-strap issue. Another cap variation , for a "Foundling Cap", contained the following instructions

"A chin-stay is three nails long, ** and half a nail wide.....The chin-stay should be neatly sewn up the whole length, with a small button-hole at one end; they are generally sewn on at the left corner of the cap, and the button on the right." 


 This pattern also included the following option

"Some persons prefer having two buttons sewn on the cap, one at each ear, and the stay made with two button-holes, so as to be easily changed and washed, without changing the cap also, as babies are apt to wet them, which makes them hard and rough to the chin."


I have got enough experience with infants to see the wisdom in this. And anyway, when it comes to Victorian baby clothes, the more button-holes and buttons the more fun! So on this cap I added the double button holes.


Getting good shots of this without an actual Victorian infant to put it on was somewhat challenging.


Brian also gave me some lovely vintage ceramic buttons to add a nice little touch.

I'm quite pleased with this cap. However I will say that as cute as I think it is, the runner does not create nearly the amount of ruffle shown in the illustration in the plate. Having gone through several variations on how to do this, I feel confident saying that it's just going to- which is fine. I just need to keep in mind for future projects that the plate is a rough guide, may romanticize the finished product a bit.


So, big takeaways from my first foray into the Workwoman's Guide

  • Read the whole section for the type of garment, not just the variation you are making
  • It may not look exactly like the plate (and that's ok). 
I will be packing several finished caps up this week along with cut out pieces to work on new ones. I hope to make some more garments to send out as well before the run is over. Hopefully we will see some pictures of them in action soon!


Tuesday, August 15, 2017

New Cotton Spencer

Of course, one of the best parts of the Jane Austen Festival is the shopping! 


Honestly, I think I did a pretty good job of holding back this year, all things considered. But one thing I was really after was some fabric for a new spencer. Since so much of my living history time is spent in very warm conditions, I really wanted some light cotton. The only other one I have is cotton velvet, and I just didn't have the heart to even try putting it on this summer. 

I think it shows how the further I go the less I feel like I have to prove. My first Jane Austen was like 'I WILL WEAR THIS THING ALL DAY TO SHOW OF WHAT I AM MADE'. This year I kind of looked at it in the closet for a second in the morning and thought 'wow, that looks unpleasant, I'm not gonna do that'.


My main inspiration piece was this one from Gennessee Country Village, graphed out on 19thus.org

(back view)

I found some lovely cotton from Regency Revisited which really reminded me of the print on this short gown 


For the body pieces on this I used a pattern that was draped on me at a Burnley & Trowbridge  pelisse workshop in 2015. The sleeves I had drafted for another project last summer, and the collar I pulled from the Period Impressions spencer pattern.

My main goal with this project, other than making something that won't kill me in the heat, was to not obsess over details and crank something out. I've gotten VERY into period hand- construction details the last couple years, and in general I am prone to obsess over every little detail as I go. For the most part I really enjoy that, but it's also starting to feel like everything I do takes forever. So for the most part I tried to forgo all the period topstitching techniques  and actually let myself crank this one out.

There were a couple of exceptions to this. I pinned the bust darts in place and topstitched them down by hand.

This is a wonderful fitting technique I learned at the same B & T workshop which saves SO MUCH TIME I used to spend stitching a dart on the inside, trying it on to fit, restitching, etc. To help with the fitting I actually sewed hook and eye tape down the front before I fit the darts.


This way I had the front fastened exactly as it will be when I fit the darts, instead of trying to approximate that fit with pins.

From there I added a waistband which I sewed on by machine and finished by hand. 


Unfortunately when all was said and done, it was fitting kind of loosely on the bottom. I had hoped that the waistband would take care of this but it didn't, so, with Brian's help, I added a pleat in the back. 


The finished result is cool and comfortable, I am very happy to say.


Photos by Brian Cushing.
Bonnet by Lynn McMasters 


Thursday, August 3, 2017

Jane Austen Festival 2017

I think this was my favorite year for the Jane Austen Festival yet. For once, the July weather in Kentucky was (relatively) obliging, at least enough so to allow a certain degree of comfort and gentility. I was quite pleased with how our set-up came together. What I'm calling 'The Parlour' is shaping up as a comfortable and social atmosphere, the 'Meryton' to Lady Caroline's 'Rosings'. We've created a really love place that is focused on interaction with the visitors while providing respite and relaxation for the event participants and organizers.

There was some lovely cards and conversation


Mr. Armitage came to visit the parlour
Photo by Janet Abell

As well as some genuinely delightful visitors.


This little lady had the most delightful manners, she obviously took after her lovely and refined parents. 
Photo courtesy of Historic Locust Grove


Several of whom we introduced to the game of whist. I have come to really love period card games, they are such a wonderful way to give someone a really hands on, interactive experience - and the folks who come to Jane Austen are always ready with the kind of wit and conversation that these games are really made to facilitate!


Photo by Asha Ananda


And then there was the duel, where so many of the living history performance techniques I have talked about on this blog came very nicely into play.

For this year's scenario we took an episode out of Locust Grove's history which blended well into Jane Austen.

In 1822 Ann Croghan, daughter of William and Lucy Croghan, the owners of Locust Grove, was married to Thomas Sidney Jesup, the Quartermaster General of the United States Army. This was an advantageous match for her, to say the least. While Ann had grown up in one of the wealthiest houses in Kentucky, she would now move to Washington City and move among the leaders of the nation. However all was not smooth on the way to the alter.

On August 6th, 1821, her brother in law George Hancock wrote to Jesup

"...You must have been impressed with the belief that Miss A [Ann Croghan] was engaged to D. [Davis] and as you have asked me as a man of Honor to state whether this is true, I will as such state what I know to be true. First I most positively say that she never was engaged to him, & that she never intended marrying him......"


Mrs. Jesup after her marriage
Original portrait is on display at Locust grove, photo by Fox & Rose Photography


Later that month, on August 28th, Hancock again wrote to Jesup


"....I this morning received your letter of the 20th inst. your having heard that Miss C  was to be married to Mr. B is another instance of the disposition of mankind to circulate reports, that have not the smallest grain for their origin--previous to my leaving Louisville I had a conversation with miss C. & the subject of my letter was to known to her’ and had she been engaged she would not have subjected me to the unpleasant result of such a fact...."


Thomas Jesup by Charles Bird King


Marrying Jessup was more than a romantic match for Ann, it set her up for a life of comfort and status, all of which this gossip was endangering. And as a woman, she was in a difficult position. A male relative had to intervene to help smooth over the situation with her intended. As it was, Jesup believed her brother in law, and the other suitors withdrew, but what if things hadn't worked out so smoothly? Our scenario then was that Brian, who loves to be the villain, had endangered Brandon's sister's intended marriage by spreading rumors that he himself was engaged to said sister.

We also tried to change things up a little to incorporate some of the research we had done into dueling recently. For starters, we let the seconds handle most of the negotiations. They also marked out the agreed upon space between duelists- going back to back may look great in the movies, but it was not dueling procedure in the 19th century.

Mr. Phipps, as second, hands his principal his weapon
Photo courtesy of Historic Locust Grove


The thing about street theater is, it has to read from far away. If you think like a film actor and get up in each other's faces, it just gets lost more than a few feet away, and you won't attract any attention. You also want to work very hard to bring the crowd to where you want them. In this case, our players began with a 'preshow' scene at the top of the circle drive in front of the house. The duelists met with their seconds, aired their grievances to the crowd, then parted, each going the opposite way around the circle drive. As they went, they continued to air their grievances to anyone they could find, drawing the crowd with them as they reached the dueling ground, where grievances were once again aired for the assembled crowd.

At the same time, several of our usual Locust Grove players moved through the festival, drawing focus to the duel and moving the crowd towards the appointed place 'Oh my goodness, have you heard, the gentlemen are going to duel! OVER THERE!!' 

I enjoyed going up to several of the gentlemen and saying "Sir, you look as though you are a man of the world, will you please attend this dreadful event and be sure that all is carried out above board and honorably according to the Code Duelo?'


And of course, duels are practically made for cheating out to an audience!
Photo courtesy of Historic Locust Grove


 On Sunday, the duel directly followed Brian's Dressing Mr. Darcy talk. This presented an intriguing challenge/opportunity- how to move him from the main tent to the dueling ground, keeping his audience with us as we went, rather than creating chaos and losing them.

Brandon and his second approached from the entrance to the tent. Brandon stayed back several feet, doing a lovely job of projecting physically to gain focus. Dave, his second, stayed at the edge of the tent, challenging Brian and his second who stayed on the stage. This way the dialogue literally happened over the heads of the assembled audience in the tent, so that they could see and hear it all clearly.

I was beyond proud and pleased when several of our other seasoned interpreters instinctively appeared to help move the crowd from there. We had two of us each on either side of the exit then motioning and moving the crowd the way we wanted them to go.


What you can't tell is that they are perfectly station to guide folks coming out of the presentation tent the way we wanted them to go. I didn't even ask them, they've just developed the sense and appeared where they were needed. *sniff* IT'S SO BEAUTIFUL! 


We also didn't have one of the duelists die on Saturday. Instead, one of our principles took a hit, and honor was satisfied, resolving the matter. Duels make for naturally great theater, but one of the sticky bits is what to do with an actor who has 'died' in front of a large audience who, generally, refuse to leave until he gets up. But the reality is that duels did not always end in death- in fact, many never occurred at all, if the seconds were skilled enough negotiators to bring the matter to a close without violence.


I am a little troubled by how unconcerned his second is....
Photo courtesy of Historic Locust Grove


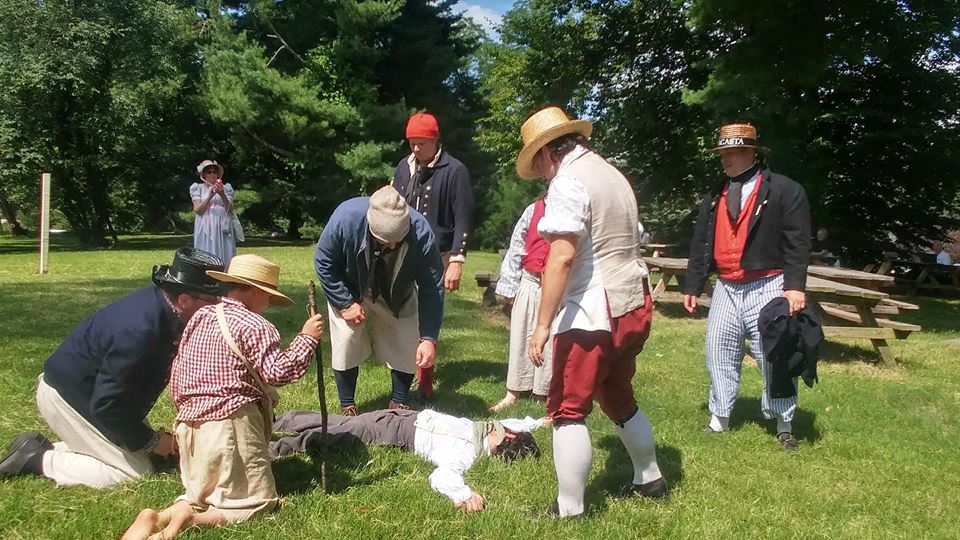
However Brian just loves to take a hit, so, on Sunday, down he went. Luckily the solution presented itself in the form of several willing and burly sailors from the Acasta who hauled him off.


Not before picking him clean, of course!
Photos courtesy of Historic Locust Grove


Btw, there is another interesting etiquette tidbit from the Ann Croghan saga which Austen fans will appreciate- in his first letter, Hancock assured Jesup of the reason he and Ann had yet not been officially engaged

"At the time you addressed her I know that she intended to have you, and the morning you addressed her at Mrs Prestons that she had determined to engage herself, but was advised by a Female Friend first to consult her Father, & she determined not to encourage you until she had & supposed that she would in a short time see you in Washington, when if her father consented she would engage herself"


Sunday, June 11, 2017

Peas-Porridge, New Favorite Vegetarian Reenacting Recipe

Just a quick post to say I have found a new favorite vegetarian early 19th century recipe.


From my reprint of the 1804 edition of Hannah Glass


To Make Peas-Porridge

Take a quart of green peas, put to them a quart of water, a bundle of dried mint, and a little salt. Let them boil till the peas are quite tender; then put in some beaten pepper, a piece of butter as big as a walnut rolled in flour, stir it all together and let it boil a few minutes; Then add two quarts of milk, let it boil a quarter of an hour, take out the mint, and serve it up.

I chose this for a demo recipe at Locust Grove today, mostly because I was just tickled to actually be making peas porridge, and the ingredients were cheap. However beyond being amusing, it also turned out to be delicious!

I used a package of dried green split peas and fresh mint from the herb garden at Locust Grove, since I didn't have any dried (it gave a great flavor!). I may have put in too much water since it still wasn't very thick by step two, so I didn't end up adding a lot of milk. Not really sure how to translate a 'walnut rolled in flour' (is this before or after shelling? How robust is this walnut?), so I just went with a very large dollop.

 Not sure how I'd feel about it after 9 days, but it has continued to thicken up nicely as it sits. It also reheated very well in the microwave for dinner. Safe to say this is making it into my regular reenactment rotation!


Makes an especially great meal with bread, cheese, and wine (wine not pictured, probably because I was drinking it).