Monday, June 27, 2016

Cooking Over the Coals

So, branching out into some other areas of the early 19th century, I've been taking my turn doing some cooking over the hearth kitchen at Locust Grove. This is something I've been really wanting to do for a long time, and I've been very excited to finally jump in! It is definitely a 'learn by doing' process.


Bread dough rising while the fire burns down to some good coals 


My first foray I had Brian to guide me. He is definitely the baker in the house, and his bread is divine. Baking it in a dutch oven over the coals is actually pretty easy- and that's coming from someone who has hitherto stayed clear of baking!


Brian at the Hearth
Photo by Fox & Rose Photography 

For Antiques Market yesterday, I decided it was time to take it a bit further and try out a few recipes beyond bread. (And if you have never been to a Locust Grove Antiques Market, you must check it out! It's like a museum you can touch!)

In addition to bread, I tried out the following recipes from the Croghan era:


Pound Cake
One pound sugar, one pound butter, one pound or ten eggs, rose water one gill, spices to your taste; watch it well, it will bake in a slow oven in 15 minutes
-Amelia Simmons
American Cookery

1796 

I actually only had about half the required amount of rose water (1 gill = 4 ounces). I also added cinnamon for the spices. It's present in several of the other recipes in Amelia Simmons' book, and its still a modern favorite in baked goods. 

I took 'slow oven' to mean that I shouldn't use nearly as many coals, however after 15 minutes it was definitely not done. I added more coals on top, but that seemed to brown the top without cooking the inside. Eventually I remade a nicer bed of coals to move it onto, then put a moderate amount on top. In future, I think the key for something like this will be a really nice bed of coals underneath to provide heat, without heaping too many on top so it doesn't brown too much. 

In any case, this one was a big hit! The rosewater is divine, even with a half portion. I think it's a really good example of how smell influences taste. It just wafts up to your nose as the cake approaches your mouth which provides the taste. (I tried some of it on my finger to taste directly, and it is NOT good). 


What's that? Am I hot? Oh no, WHY WOULD YOU THINK THAT?!
Photo by Hannah Zimmerman 


To Make a Barley Soup
Take a gallon of water, half a pound of barley, a blade or two of mace, a large crust of bread, and a lemon peel. Let it boil till it comes to two quarts, then add half a pint of white wine and sweeten to your palate.
-Hannah Glass
The Art of Cookery Made Plain and Easy
1805 Edition

This one was a little more complicated- which is to say people did not much care for it. The interesting part is why- did I screw up, or have our palates changed so much? The directions clearly state to first reduce the soup, then add the white wine. Everyone who tasted it was, to say the least, taken aback by the forcefulness of the white wine taste. 

On the other hand, my lemon went walkabout and did not get put in, and the only spices I had to add was the mace, so perhaps those other flavors could have balanced it out more. Perhaps I'll try again- when the weather gets cooler.


Wednesday, March 30, 2016

1815 A Tale of Three Dresses

So it's been almost a year since I finished this dress, and I finally found some time to blog about it! Better late than never, right? Because I am actually super proud of it. I think I will actually do another post later with some further construction for details.

For this post, I am using this dress as a case study in connections between British and American fashion in the year 1815. This post will focus on three particular examples - two American, one British- all dated the same year which exhibit very similar characteristics.


In action at Locust Grove
Photo courtesy of Fox & Rose Photography

Of course, it should always be kept in mind that a museum date is a secondary source, which is why it is important to consult a variety of sources and look for consensus. Looking at these three dresses, which have all been given the 1815 date, shows some very similar elements which, put together, create an image of fashionable trends on both sides of the Atlantic- along with some of the individual choices of their wearers.

Mine was mostly was a recreation of the dress on pages 99-100 of Costume in Detail (CID).


CID is a fantastic book if you don't have it, but it does leave some details out. Since it was written in the 1970's, it occurred to me that many of the pieces might have been digitized by now.  Some googling got me exactly what I wanted. The dress is part of the Snowshill Collection in the care of the National Trust in the U.K.


The entry at the National Trust actually did come with some great details which weren't in the CID description. The National Trust description notes that the apron front has a 'running tape tie' and that the skirt has 'slightly flared side seams". It also notes "Front sections bias cut with dart for bust" which is not directly noted in the CID description. I have since been able to track several of the pieces in CID down through the National Trust website where you can frequently dig up more details, not to mention seeing them in color. 

I was also able to get a lot of insight from this dress in the Genesee Country Village collection, as photographed and sketched by the amazing Betsy Bashore. This one has also been dated to 1815.


Photos and sketches are copyright and courtesy Betsy Bashore.
 If you have not yet checked out the amazing resources Betsy has made available, do it NOW. 

 It is striking how similar the style is to the British example. Each has the apron skirt separate from the bodice, with the high neck and front closures. Both also have long sleeves.


Photo copyright Betsy Bashore

There are differences- the American dress has buttons while the British does not. Both the CID and National Trust descriptions note that the British dress  'shows signs of pinning', so that was probably how it was closed. The American dress also does not have the overlapping under bodice, possibly because the buttons made it less necessary. The American dress has the collar laying flat while the British has the small standing collar with the double self frill. However both are clearly variations on the same theme. (After working with the version which requires pinning, I can say that my next attempt at this style will definitely be using buttons. I can imagine it would be less time consuming and make it easier to create a smooth line).

While the British example had the skirt in two pieces with a 'slight flair' cut into each, the American example incorporates a separate side piece cut at an angle. Both methods lean towards the 'A-line' coming into fashion in the teens. My suspicion is that the amount of fabric available dictated whether or not a separate side panel could be incorporated. 

This third example in the Met from America in the same year also shows many of the same basic elements of the British and Genesee examples.

Metropolitan Museum of Art 
Accession Number 2009.300.943

It has the same high neckline as the other two, and the same double self frill on the collar as the British dress. It also has long sleeves just like the British and earlier American example. Here the skirt is not separate from the bodice as with the other two.

It should be noted that I have seen some very learned folks describe this garment as a 'pelisse'. This might be chalked up to the blurred lines in this period between different garment types. In any case, the basic elements of the garment still show striking similarities to the other two.

 There is a great deal of scholarly research to back up these connections across the Atlantic. In her amazing book The Needles Eye: Women and Work in the Age of Revolution, Marla R. Miller writes about the role fashion as a culture transmitter both between continents and within the continental United States. Fashion would enter the United States along with other goods through major shipping points- Philadelphia, Boston, New York- and travel inland from there. In addition to fashion plates, women would demand that their friends and relatives visiting major port cities bring back descriptions- or examples of- the latest trends.

We can also find evidence of these connections in the Louisville newspapers. In 1815, with the war over and the embargo lifted, Britain began to dump goods on the American market. The advertisements run in the Western Courier newspaper show the arrival of these goods on the Louisville market.

The following advertisement was run before the war was even over:

"New Store. VAN BUSKIRK & POWERS Have just received from PHILADELPHIA, and are now opening in the STORE ROOM formerly occupied by C. Van Buskirk, and opposite the LOUISVILLE HOTEL, or Sign of the Golden Eagle, a large and General assortment of BRITISH AND DOMESTIC GOODS, together with a large assortment of GROCERIES all of which they are disposed to sell on moderate terms, for Cash, or such country produce as may suit.- Louisville, November 8th 1814"
(Transcribed from the Filson Historical Society)


While I have tried to focus on these three particular garments to narrow the focus of this entry, there are more surviving garments and sketches from the period illlustrating this style. Interestingly, I have not seen this exact style featured in any fashion plates from 1815.  I have, however, been able to find examples in sketches and genre art. 

This sketch from 1816 in the Met shows a similar high neckline, likely with the same apron skirt (not to mention a *fabulous* ruff). 


Lady Mary Cavendish-Bentick, 1816
Metropolitan Museum of Art Accession Number 43.85.6

The Met is listing this as 'French' because of the artist, but, admittedly without further research, she sure sounds British to me. 

We an also find an example of this style as early as 1813 in American genre art. Here is John Lewis Krimmel's Merrymaking at a Wayside Inn. If you look at the young lady gettin' friendly with her fella in the bacground stage right, I *believe* we are seeing a similar gown. 


Attributed to John Lewis Krimmel "Merrymaking at a Wayside Inn" (probably) 1813
Metropolitan Museum of Art Accession Number 42.95.12
Following the link to the Met will allow you to zoom on a high res image

There is a white part on her neck and shoulders, but I think that is meant to capture light because you can clearly see the same high collar and double self frill from the British example in CID and the dress (or pelisse) in the Met. This also shows a very similar check to the British example at the beginning of this post.

Comparing these three dresses shows many similarities in fashion in Britain in American in 1815; the high neck, the apron skirt, the self frill. The variations are also important- each individual dress shows variations on these basic lines. The women who wore them in 1815 (and presumably for some years after) made individual choices based on a basic idea. Comparing these dresses shows connections between their wearers, but also their individuality.

Sunday, December 27, 2015

Locust Grove Interpreters - a taste of the awesome

Trying to get myself blogging again, and the cheater easiest way is just to brag on the First Person Interpreters at Locust Grove. Ok, basically I just loved this picture so much I had to put it here.


Photo by Heather Rene of Fox and Rose Photography.

I really cannot brag on our cast enough, and this was just a wonderful example of the incredible talent and creativity everyone brings to this program. The two actors here portray Charles and Dr. John Croghan, the first generation born at Locust Grove. They were both nephews of General George Rogers Clark who spent the last years of his life at Locust Grove from 1809 to 1818. Both young men have done a great deal of research into the family and the period and trained and rehearsed tirelessly to turn that research into a natural, interactive performance for guests to Locust Grove.

Even though you can't see her, Heather also brings an amazing amount of talent as our cast photographer. I am really amazed at how she finds these little moments to bring to light.


Thursday, December 3, 2015

Regency/Federal Hair Pieces, Part Two: Doin' the Do

Hulooo! So it has taken me five months, but I finally found a spare day to put this together. Many thanks to my wonderful partner (in crime and all other things) Brian Cushing for taking the pictures.

Many people have asked me how I do my hair for the Regency/Federal period, so I thought I would put together a blog post. The first part of this, where I create the hair pieces I am using, can be found here.  To be clear, this is not a period method- this is a nonperiod way of mimicking the period look since I don't want to actually cut my hair short in the front.

So, first of all, when I say I have long hair, I am seriously not kidding. It is absolutely *perfect* for doing Victorian hair, but Regency- not so much.


Honestly, the hair is driving- I'm just along for the ride.


Since I don't want to cut my hair short enough in the front for curls, I have to get creative. I used to try to wrap the front pieces around my bun, tack them down in front, and curl them, but that is time consuming, a literal pain in the arm, and requires access to an outlet.

Once I embraced hair pieces, life took a meaningful upturn.

Here are the materials you will need


  • Hair pieces on wig clips- see Part I  (you may not be able to see it, but I am storing them with the curls tightly pinned up. This not only preserves the curl but helps keep them from tangling while stored). 
  • Hair brush 
  • Bobby pins (2 pictured, many required)
  • Some kind of larger pin- I'm using roller pins, but large hair pins will do. You want at least 3 or 4 of these to anchor the base of your bun. 
  • 2 medium-sized claw clips 
  • some kind of pomade. I had been using the 'blue goop' by Bed Head, but I recently switched to this stuff (the orange one) from Got2b, which is apparently the poor girl's Bedhead.Unlike the more expensive Bed Head stuff, it goes on clear and seems to work just as well if not better. (It does smell like orange, but I'm good with that.)
  • Not pictured- a comb with a pick will be helpful when it comes to sectioning your hair. I don't usually use hair spray on my actual hair, because I have found it just tends to accentuate, rather than tame, all my flyaways. 

Before you begin, work a little pomade through your hair with your fingertips. This will help with volume in your bun and keep the braid smooth. Especially make sure to get some in what will be the front sections of your hair, because you will want that to be able to lay smoothly over the pieces when you are done. Be careful not to use too much however, as it will make your hair look lanky and could also cause it to separate rather than laying nicely in one piece

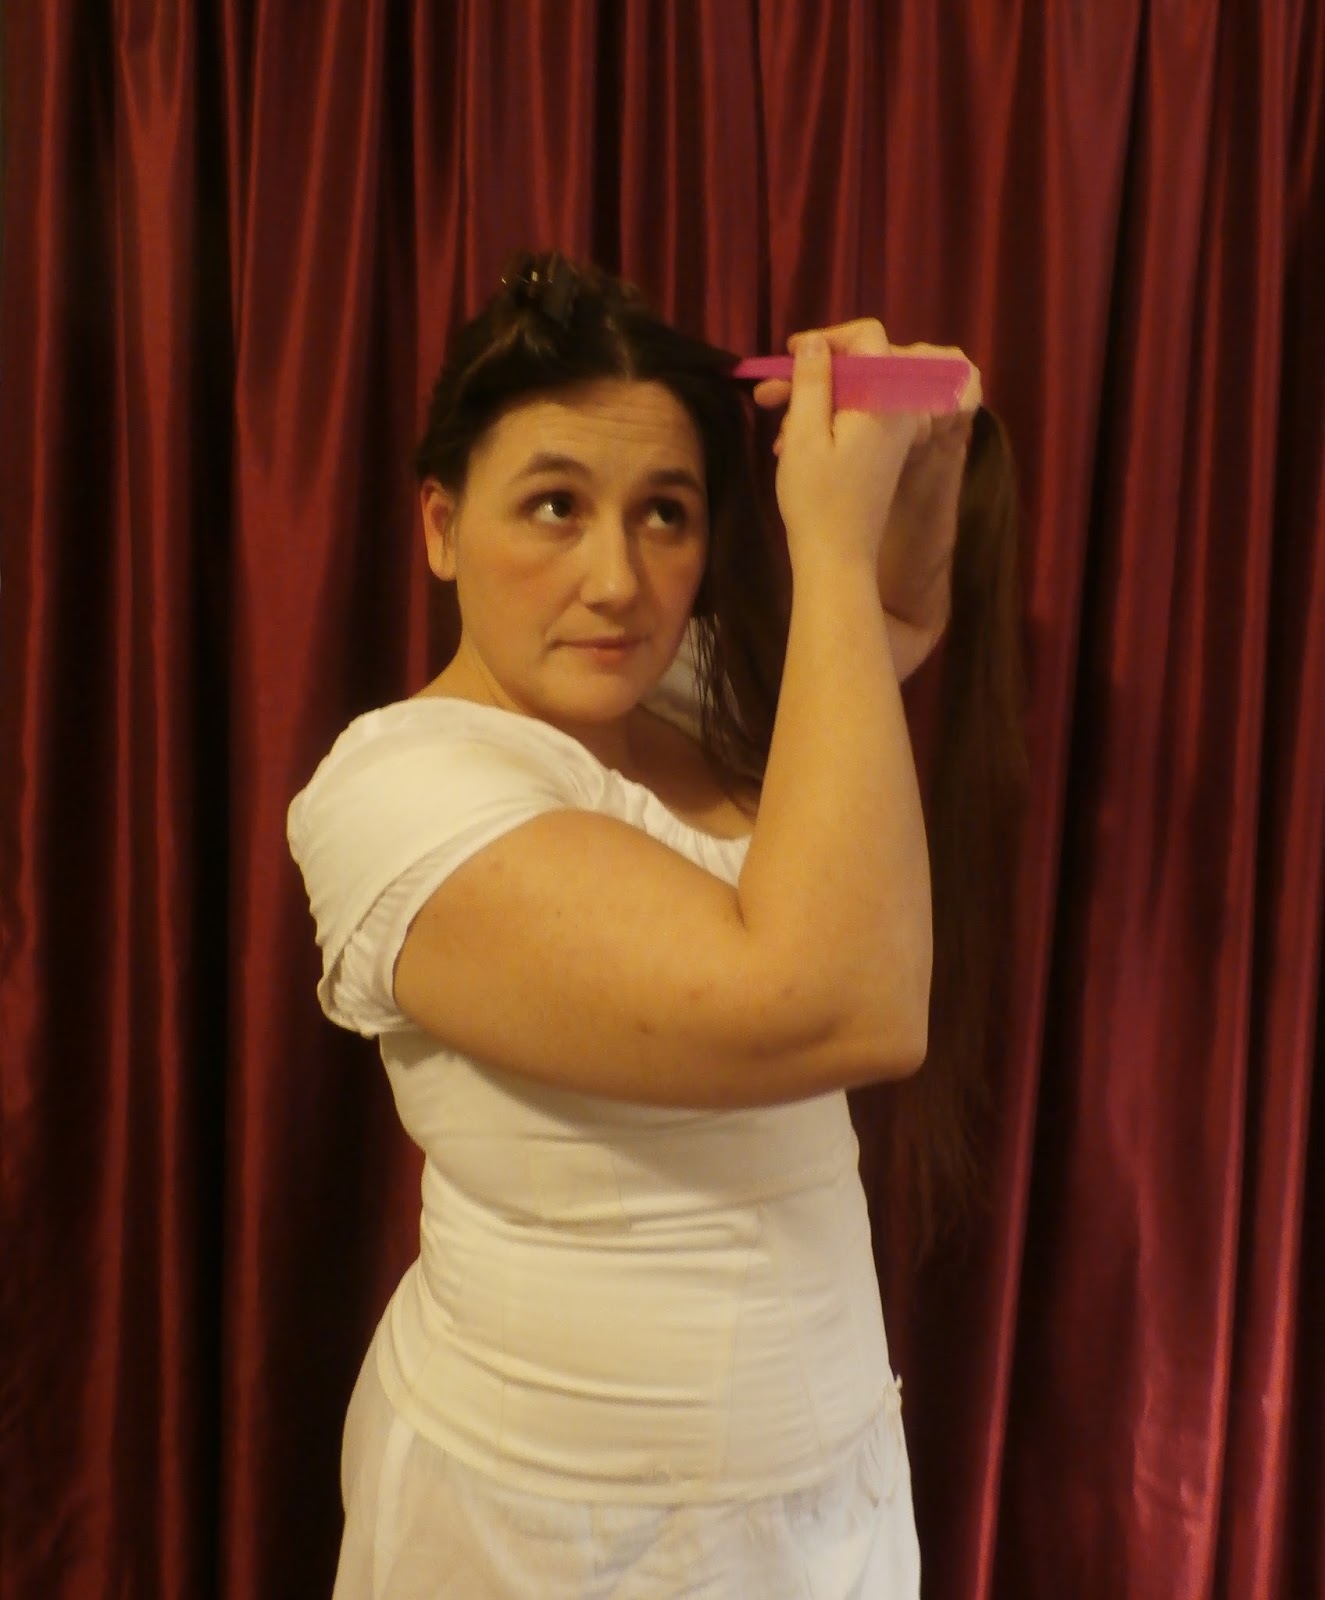
Section out the front of your hair on each side of your face, roll it up, and secure it with the clips. You want this section to go back to the middle of your head. Part of this will end up covering the clip in pieces, and the more you section out here the easier it will be to get a nice, neat bun in the back.


From there, take the remaining hair and make it into a ponytail as high as you can. Brush around the base to try and make it as smooth and as high as possible.

Then begin to braid the ponytail, while keeping it as high on your head as possible. I don't use a ponytail holder at the base, because I have found that it makes it harder to keep the hair on my head nice and smooth. Hold it straight up from your head as long as possibly to try and keep it anchored very high. I usually use a small rubber hair tie to hold it in place at the end.

You can work a little more of the pomade over the braid at this point to keep it nice and smooth.


Unfortunately, this is the part that can be a bit of an arm ache.


From there, twist the braid into a bun. The regency style is to have the bun very high on the head, so try to twist it around towards the front and get it as high onto your head as possible.

I usually anchor the base with a few of the larger hair pins/roller pins. Then as you go anchor the bottom of the braid to your head with bobby pins.

You will want to tuck the end of the braid under and into the center. Try to think about where it is going to end up so you can leave a space without bobby pins to tuck it into. Either pull the hair tie off or make sure that it is tucked all the way under so it does not show.


Next you will break up the front sections. This is where a comb with a pick will come in handy.

What you want to do is unroll them, then section out the bottom and roll the top back up. You will be braiding the bottom section and wrapping it back around your bun. The top section will be what covers the clips once they are in place.


When making the top section, you want to think about making it as small as possible in the front so you can get as close to the center of your forehead as possible, but at the same time you need to leave enough that it will cover the clips.

Instead of making two equal sections, I usually try to make the top wider in the back to give it more body, and narrower at the front so I can get the clips close to my part.

Once you have rolled the top bit back up into the clip, braid the bottom section. Angle it back away from your face so that it will lay neatly against your head- if you  hold it perpendicular to, or away from, your face while you are braiding, it may bunch when you try to position it back.


Angle it back away from your face in the direction it will end up laying. 


Wrap the braid around your bun and pin in place. 


Once you have done this on both sides it's a good time to take some of the pomade and smooth any flyaways on your forehead back and away from your face so they don't end up peeking out once the curls are in place.


Next, clip the curls in place. Get them as close to your center part as you can while still anchoring them securely and being sure they rest flat against your head.


I've added some slightly larger curls, done with a 1/2 inch iron and also mounted on wig clips, to the back to better frame my face. 
Since I have a rounder face, I've always found that hairstyles which frame it are more flattering. 


Next, you will unclip the top front sections, brush them out, and carefully lay them over the curls to cover the clips (this is why you want to leave a bit of the hair at the top of  your curls flat instead of curling it all the way to the clip). Keep the top section as smooth as you can, and pin it in place at the base of your head.


I use to just wrap these sections around the bun, but that ruined the lovely braided look, so lately I have been anchoring both sides at the back, then braiding them together and wrapping that last braid around the bun.


Et Voila! 


Accessorize and dress it up, like with this comb from Regency Revisited. 


In action at Locust Grove. 
Photo by Heather Rene of Fox and Rose Photography. 


So there you have it! I really recommend trying this out before you have a big event and seeing what works with your hair. Everyone's is different, and this is what worked for me. Hopefully it gives you some ideas! 


Tuesday, July 28, 2015

Locust Grove Interpreters

I'm having trouble getting this to post in comments, but if you want to know some of what we have been working on at Locust Grove, check this out


Photo by Heather Hiner of Fox and Rose Photography


This was a special event showcasing a wedding in 1822.You can read more on the Locust Grove Blog. 

Normally our interpreters portray members of the Clark and Croghan families and other notable Louisvillians who would have visited Locust Grove in 1816. I have been the theatrical director for this program for the last 2 1/2 years (since I moved from California to Kentucky) and I could not be more proud and blown away by what this group has done.

Locust Grove interpreters are all volunteers. The Grove holds open auditions 1-2 times per year. During the year cast members attend a series of workshops on the history of the home, period manners, games, language, clothing and physical characterization. Interpreters also bring their own research on their characters and period trades and pastimes to the program. During rehearsals we work on taking historical information and presenting it in a natural manner with our guests. Interpreters provide their own clothing after their first year, all of which must pass approval. These are some of the most trained and dedicated volunteers you will find anywhere.

In the last year, interpreters have become part of an increasing number of Locust Grove events. This group performs in extremely varied conditions, from close quarters with guests in the house, to the open air of the 55 acre grounds. Each and every time we go out there, I have seen our people rise to new heights. In it's heyday, Locust Grove was a bustling farm, with probably 60+ people living there including the enslaved workers. We may never be able to actually recapture the level of activity from the early 19th century, but our people make the place come alive in a way that gives you an idea of what that may have been like. It is truly special and I honestly cannot say enough good things about each of the people it has been my privilege to work with on this program.

Sunday, July 12, 2015

To cap or not to cap?


A common myth or 'reeanctorism' I hear in the Regency/Federal period is that 'all married women always wore caps'. I think there is this idea that as soon as the nuptial festivities are over, a committee of very dour matrons show up with the local minister for the awful capping ceremony, wherein the young bride's once pretty locks are shorn in the back, and the cap is surgically installed on her head. Like, that's it, it's over, YOU'VE BEEN CAPPED.

There are a couple of things about this that I feel need to be cleared up. For starters, this seems to sometimes come with the idea that wearing a cap makes you 'old' and caps have to be ugly. Please see below for several images on how this is inaccurate and caps can be very lovely.

However it is also simply not true to say that all married women always wore caps. As evidence, I give you the following sampling of  images from Britain and America (you can easily find more if you look around, trust me, I held back).

First, a couple of American examples:


Mrs. John Norton, born Sara Low 1818 

oil on canvas Speed Art Museum 1971.1.6.2

(American)


Mrs. Ann Booth Gwathmey c. 1820 

Filson Historical Society 2010.2.4

(American)


And here are a couple of beauties from across the pond:


Mrs. Mary Fisher 1816
(British)


And, my personal favorite, two kids and no cap!


Lydia Elizabeth Hoare (1786–1856), Lady Acland
1814-15
(British)


Now, don't get me wrong- caps are great! There are some amazing caps out there I just drool over.

For example, this lovely lady from America 


Lucy Price Weisiger 1820
Kentucky Historical Society 2010.54.9
(American)


And this stunning British beauty 


Mrs Catherine Morey 1814-15
(British)

Several stunning extant examples also survive from this period, such as  this amazing rouched goodness from the Met 


1812 American, linen 


And OMFG are you *kidding* me with this amazing craziness?!


1810s American, Cotton 

Unmarried women also wore caps, famously including Jane Austen, so it may simply be better to say that older women were more likely to do so (which is not to say that younger ladies cannot wear caps as well). As with many things, if you are looking for a hard and fast rule you may end up leading yourself astray. Caps are an *option*, and a lovely one at that, but they are not a requirement.


Monday, June 22, 2015

Regency/Federal Hair Pieces, Part One: Making the Pieces

Edit: You can now find part two of this showing how to work these into long hair here.

This post includes hot and sharp things: please use caution and common sense. If you cannot be trusted with hot and/or sharp things, maybe go do something else instead of suing me because you are burned and bleeding. 

Several people have asked me about how I do my hair for the Regency/Federal era, so I thought I'd dust off the old blog and explain. This post will show you how to create the hair pieces I have been using. For the sake of keeping it short(ish), I will write a separate post soon on how I work them into my hair.


In action at Locust Grove.
Photo by Fox & Rose Photography.

My hair comes down past my waist. Before a recent cut, it was below my butt. And while I love it dearly, it is actually too long in the front for perfect little Regency ringlets. I used to try wrapping the front parts around a bun in the back and then pinning them in place and curling them. That worked alright, but it was very time consuming and the curls didn't always do great in high humidity. It was also impractical if I didn't start the day with an outlet handy, and let's face it, some of the coolest places to sleep just don't always have electricity!

Since it is so long, I would have trouble fitting it all under a wig. Wigs also add to the heat factor, which is the last thing I need in a Kentucky summer, so pieces I can tuck into my hair are the best way to go for me. (If you are interested in doing a full wig, you can see a wonderful tutorial from the Bohemian Bell here.)

To begin with, you will need the following


  • Hair scissors 
  • wig clips
  •  needle and thread (the thread won't show but you should still find a color that doesn't stand out from your natural hair color, I'm a brunette and I'm just using some black here)
  •  curling iron- dont' use your best one (I'll explain below). For  the curls right around your face I recommend a 3/8 barrel. I also use a 1/2 inch for some larger ones in the back. 
  •  hairspray
  •  (not pictured) roller pins/ bobby pins 
  • Fake hair (or human hair)


Now, I know some people taught the benefits of using human hair, and you can totally use that if you want to. Personally, I am uncomfortable with it, so I use this stuff. The following instructions should work for either. Make sure whatever you get says that it can take a curl.


This stuff holds a curl well, and is very cheap. This package was $6.99 and it is going to last me a good long time, since I only go through a few inches at a time. You can usually find this or something similar at ethnic hair store wherever you live. You can also search for it on Amazon.

It can leave a little bit of residue on your curling iron. This wipes off pretty easily while still warm, but this is why I don't recommend using anything extremely expensive or fancy (I got mine on Amazon for $20 or so). Please do a test strip on your iron and use caution and common sense.

It comes in different lengths. This stuff was 10 inches, which is a little long for what I needed, so I took off 2-3 inches. When you take length off the bottom, try to layer it a little instead of just chopping right across to create a blunt end. What you want is something that will fit nicely into the bottom of a curl. I haven't tried this, but someone who knew what they were doing with a razor blade could probably create a nice effect. Again, please use caution and common sense and don't sue me. (Trust me, I'm a teacher, you're not going to get much. )


For these pieces, you want a piece about 3-4 inches wide which will give you 3-4 curls. I usually double it over to give more volume, so I would cut an 8 inch piece. It is held together at the top with a nylon weft so it shouldn't fray when you cut it (human hair should be similar). Double it over and sew the two lengths together on the weft so you have one nice secure piece.


Prepped and ready to curl. 

Now it is time to start curling! I do this on my ironing board (SO much easier than trying to do it on your own head!!!).

The next two steps can be done in either order, depending on what you are comfortable with and what kind of hair you are using. I have heard from folks using human hair that it may be easier to sew the clips to the weft first, since human hair may not hold a curl as well the first few times it is set. Personally, I like to make sure I have gotten the curls the way I want them before I bother sewing on the clips.

The instructions that come with this 'hair' are as follows


The directions tell you to hold the 'hair' on the iron for 2-3 seconds. Personally, I have found that I need to hold it on a hot iron for at least a full minute for the curl to take. I recommend you try a few experimental pieces with your iron first to get a feel for how long you need.


You will want to leave at least an inch of uncurled hair near the base. This will be covered with your own hair to hide the base and clips you will be using.

Gently remove the curl and slide it off the iron. Be very careful to keep the curl's shape as you go. Once you have eased it off, it is still not completely set. Don't let it fall or bounce around. Gently gather up the curl with two roller pins or bobby pins to keep its shape and spray with hairspray.


As you go, trim away any fly-aways with your hair scissors. Since this isn't your hair (or anyone's!) you can be pretty liberal about trimming and sculpting. These should last you awhile, but even if you trim so much that you eventually can't use them anymore, the materials in one set cost less than a dollar, so trim away!

Repeat for the rest of the hair. Once you are done, you will want to let it sit overnight with the pins to set the curl. You can also just leave the pins in until you are ready to wear the curls- this will be a good way to keep them neat and tidy wherever they are stored.


Now it is time for your wig clips. These are fantastic little things. Since they are made of spring steel, you can slide them in where you want them, then just press down for them to snap closed and they hold very well.  They have little holes in the top that makes it very easy to sew them to the nylon weft. 


You can do this while they are still setting, but be sure that the hairspray has dried or your hands will get all sticky.


Finished piece- back view with wig clips stitched in place. 
You don't need to match the thread exactly but make sure it doesn't contrast. 


Close up of the stitching. 

And that should be it! Be sure to store them someplace they won't get smooshed. Storing them with the pins in is best to keep them tidy.  The best part is, you can do all this way ahead of time, and when you wake up at an event with no outlet, you can just take them out and snap them into place!


Finished piece -front view.

Stay tuned for Part Two, where I will show you how I work them into my hair.

**Thank you to Melissa Alexander for her proofreading and for sharing her experiences**